

Get Started
There are two parts to integrating with Rotor Videos:
- Server-side Integration - Server-to-server communication, such as User Registration, Finalize Order, etc.
- Client-side Integration - The embeddable video creator, built by Rotor Videos, which consumes the API and allows you to offer video creation flows from your artists' dashboards.
Server-side Integration
An example Node app handling the server requests
const fetch = require('node-fetch');
const userUID = require('yargs').argv._[0];

const apiEndpoint = 'https://api.rotorvideos.com'
const clientId = process.env.ROTORVIDEOS_APP_CLIENT_ID;
const clientSecret = process.env.ROTORVIDEOS_APP_CLIENT_SECRET;

const userIDBody = {
  data: {
    type: "user",
    attributes: {
      remote_user_id: `${userUID}`
    }
  }
}

// Partner App Authentication
const params = new URLSearchParams();
params.append('grant_type', 'client_credentials');

fetch(`${apiEndpoint}/oauth/token`, {
  method: 'POST',
  headers: {
    'Content-Type': 'application/x-www-form-urlencoded',
    'Authorization': `Basic ${Buffer.from(clientId + ':' + clientSecret).toString('base64')}`
  },
  body: params
})
.then(res => {
  if(res.ok){
    return res.json();
  } else {
    throw Error(res.statusText);
  }
})
.then(jsonResponse => {
  console.log(jsonResponse);
  handleAuthorizeUserCallback(jsonResponse);
})
.catch(e => console.error(e));

// Create or Find User based on Partner's unique user id.
function handleAuthorizeUserCallback(body){
  return fetch(`${apiEndpoint}/api/partner/v1/register`, {
    method: 'POST',
    body: JSON.stringify(userIDBody),
    headers: {
      'Content-Type': 'application/json',
      'Authorization': `${body.token_type} ${body.access_token}`
    }
  })
    .then(res => {
      if(res.ok){
        return res.json();
      } else {
        throw Error(res.statusText);
      }
    })
    .then(jsonResponse => {
      console.log(jsonResponse);
    })
    .catch(e => console.error(e));
}
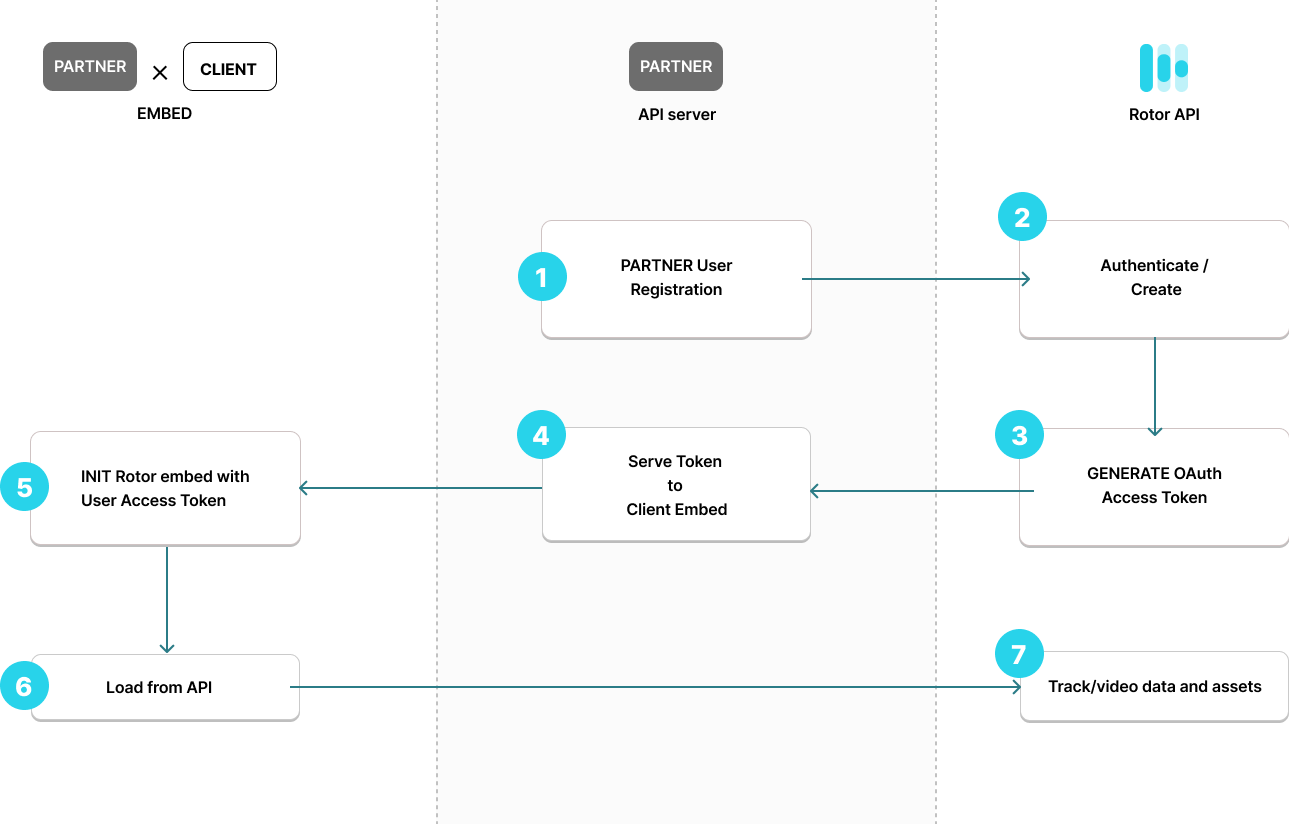
All sessions using the Rotor API start by having the Partner use their OAuth client credentials to make a server-to-server request for a User level access token for use in Rotor Client, thus associating the user ID from the Partner’s platform with a managed User object and Account on the Rotor platform.
This user's OAuth Access Token is then used to initialize the Rotor Client component and will be used for all subsequent Rotor API calls in the user's session, from the browser.
User Registration
The user registration/signin request is authorized with the Partner's access token, and the response will be an access token scoped to the User.
The first time the register endpoint is called, it will create the managed user on Rotor and then return an access
token for that managed user. Subsequent calls to register will simply return an access token for the existing managed
user.
See the Authentication Section for more details on the register endpoint.
Access Token
In order to authorize requests, the Rotor Client requires a valid OAuth Access Token for each user. The OAuth Access Token is obtained from the server-side integration (as mentioned above), which can be loaded upon session creation, or upon the loading of the page you wish to embed the component.
User Access Tokens expire, so rather than handing the client a fixed token, give it a getToken callback that fetches
the current one from your own backend. The client calls it again whenever it needs a fresh token, and your getToken
function never leaves your page.
Final Video Transaction flow
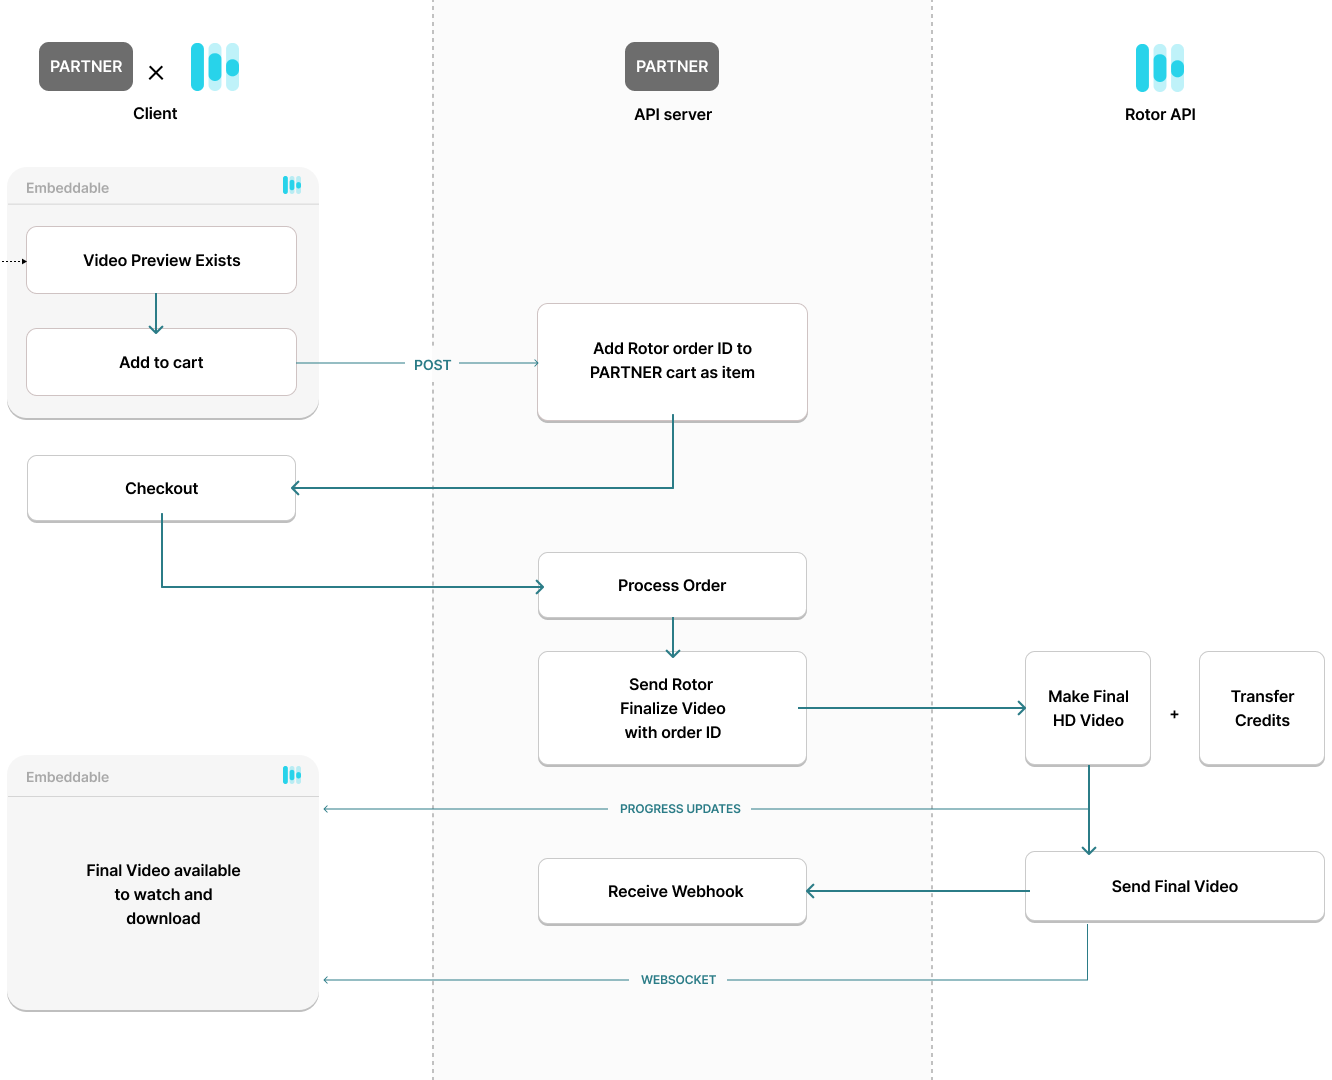
In order to finalize a transaction, the Rotor Client will make a request to the Rotor API to create a new Order. The Order will be created with the User's access token, and the response will contain the Order UUID, which can be used to finalize the order.
See the Finalize Order for more details on the finalize endpoint.
Client-side Integration
An example page embedding the video creator
import { RotorVideosClient } from '@rotorvideos/iframe';

const client = new RotorVideosClient();

client.init({
  authConfig: {
    clientId: 'partner-app-client-id',
    // Returns the User Access Token your server obtained above.
    getToken: fetchTokenFromMyBackend,
  },
  mediaAssets: [
    {
      id: 'partner-demo-track-1',
      ...
    }
  ],
});

// From your own "Make Videos" button:
client.open({ providerReferenceId: 'partner-demo-track-1' });
In order to make it as easy as possible to integrate Rotor Videos into your platform, we have packaged the tools you see on rotorvideos.com so that you can embed them into your own pages.
Through the embeddable, we ingest an artist's data, including Releases, Tracks, and accompanying assets. We use these in the background to feed the video creation process.
The recommended integration is the Iframe embed shown here: it works on any page, needs no registry credentials, and updates itself. We also provide React components and a JavaScript bundle, for integrations where the video creator needs to run inside your own application.
See the JavaScript API for more details.
REST API
Authentication
The Partner API uses two tokens. Your Partner Access Token authorizes your application; a User Access Token authorizes requests made on behalf of one of your users. Both expire, and neither is issued with an OAuth refresh token, so renewing one always means repeating the request that produced it.
| Token | Obtained from | Valid for | To renew |
|---|---|---|---|
| Partner Access Token | POST /oauth/token |
2 hours | Repeat the request with your Client ID and Client Secret |
| User Access Token | POST /api/partner/v1/register |
72 hours | Repeat the request with the same remote_user_id |
A request made with an expired token is rejected with a 401 Unauthorized. Treat a 401 as a signal to fetch a new
token and retry the request, rather than as a permanent failure.
Authorize Application
Fetch the Application's Oauth Access Token:
curl -XPOST "https://api.rotorvideos.com/oauth/token" \
  -H "Authorization: Basic `$(echo -n $client_id:$client_secret | base64)`" \
  -H "Content-Type: application/x-www-form-urlencoded" \
  -d "grant_type=client_credentials"
The above command returns JSON structured like this:
{
  "access_token": "abcdef",
  "created_at": 1234567890,
  "token_type": "Bearer",
  "expires_in": 7200,
  "scope": "<your application's scopes>"
}
In order to make API requests, you must first authorize your application, using the Oauth Client ID and Client Secret provided by Rotor to your organization.
This request returns your Partner Access Token which can be used to generate a User Access Token for subsequent requests.
expires_in is the number of seconds the token remains valid for, counted from created_at. Make this request again to
obtain a new one.
HTTP Request
POST "https://api.rotorvideos.com/oauth/token"
Data Attributes
| Parameter | Description |
|---|---|
| grant_type | Only "client_credentials" is valid for this request |
Register/Fetch User
Fetch the User's Oauth Access Token:
curl -XPOST "https://api.rotorvideos.com/api/partner/v1/register" \
  -H "Authorization: Bearer <insert token here>" \
  -H "Content-Type: application/json" \
  -d '{
    "data": {
      "type" : "user",
      "attributes": {
        "remote_user_id": "123456",
        "remote_email": "user@domain.com"
      }
    }
  }'
Providing optional attributes, in this case additional Partner API credentials:
curl -XPOST "https://api.rotorvideos.com/api/partner/v1/register" \
  -H "Authorization: Bearer <insert token here>" \
  -H "Content-Type: application/json" \
  -d '{
    "data": {
      "type" : "user",
      "attributes": {
        "remote_user_id": "123456",
        "optional_attributes": {
          "api_url": "<identifier>",
          "api_secret_key": "<secret>",
        },
      }
    }
  }'
The above command returns JSON structured like this:
{
  "data": {
    "type" : "access_token",
    "attributes": {
      "access_token": "1234567890",
      "expires_in": 259200
    }
  }
}
Register a user for the Partner API; if they exist in our system, an access token is returned. If not, we generate a new account, then return an access token for them.
expires_in is the number of seconds the token remains valid for, counted from the moment it was issued. Make this
request again with the same remote_user_id to obtain a new one.
Depending on the scope of the integration agreed with Rotor, you may need to pass additional optional attributes. These additional attributes will be stored with the Rotor user and may be used for eg reciprocal API access
HTTP Request
POST "https://api.rotorvideos.com/api/partner/v1/register"
Data Attributes
| Parameter | Description |
|---|---|
| remote_user_id | A unique identifier (on the partner platform) for the user. |
| remote_email | An email for the user. |
| optional_attributes | (Optional) For some Partner integrations, additional information may need to be provided. These can be provided nested within this attribute. Unrecognised optional attributes will be ignored. |
Tracks
Create Track
To upload/create a track, use the following:
curl -XPOST "https://api.rotorvideos.com/api/partner/v1/tracks" \
  -H "Authorization: Bearer <insert token here>" \
  -H "Content-Type: application/json" \
  -d '{
    "data": {
      "attributes": {
        "id": "unique-identifier",
        "name": "The Organism",
        "url": "https://example.com/The-Oraganism.mp3"
      }
    }
  }'
The above command returns JSON structured like this:
{
  "data": {
    "attributes": {
      "id": "unique-identifier",
      "name": "The Organism",
      "url": null
    }
  }
}
This creates a new track asynchronously. Use this endpoint in combination with the get a track endpoint to identify when the track is ready to use.
HTTP Request
POST "https://api.rotorvideos.com/api/partner/v1/tracks"
Data Attributes
| Parameter | Description |
|---|---|
| id | A unique identifier for the track. |
| name | The display name for the track. |
| url | A URL that the track can be accessed from. |
Get Track
To get a track use the following:
curl "https://api.rotorvideos.com/api/partner/v1/tracks/:id" \
  -H "Authorization: Bearer <insert token here>" \
  -H "Content-Type: application/json"
The above command returns JSON structured like this:
{
  "data": {
    "attributes": {
      "id": "unique-identifier",
      "name": "The Organism",
      "url": "https://example.com/uploads/tracks/song.mp3"
    }
  }
}
This endpoint will return the track's details by id.
HTTP Request
GET "https://api.rotorvideos.com/api/partner/v1/tracks/:id"
URL Parameters
| Parameter | Description |
|---|---|
| id | A unique identifier for the track. |
Artwork
Create Artwork
To upload/create artwork for a track, use the following:
curl -XPOST "https://api.rotorvideos.com/api/partner/v1/tracks/:id/artwork" \
  -H "Authorization: Bearer <insert token here>" \
  -H "Content-Type: application/json" \
  -d '{
    "data": {
      "attributes": {
        "url": "https://example.com/The-Oraganism.png"
      }
    }
  }'
The above command returns JSON structured like this:
{
  "data": {
    "attributes": {
      "id": "unique-identifier",
      "url": null
    }
  }
}
This creates the artwork resource asynchronously. Use this endpoint in combination with the get a track endpoint to identify when the track is ready to use.
HTTP Request
POST "https://api.rotorvideos.com/api/partner/v1/tracks/:id/artwork"
URL Parameters
| Parameter | Description |
|---|---|
| id | A unique identifier for the track. |
Data Attributes
| Parameter | Description |
|---|---|
| url | A URL that the track can be accessed from. |
Get Artwork
To get the artwork for a track, use the following:
curl "https://api.rotorvideos.com/api/partner/v1/tracks/:id/artwork" \
  -H "Authorization: Bearer <insert token here>" \
  -H "Content-Type: application/json"
The above command returns JSON structured like this:
{
  "data": {
    "attributes": {
      "id": "unique-identifier",
      "url": "https://example.com/uploads/artwork/media_file.png"
    }
  }
}
This retrieves the artwork for a track.
HTTP Request
GET "https://api.rotorvideos.com/api/partner/v1/tracks/:id/artwork"
URL Parameters
| Parameter | Description |
|---|---|
| id | A unique identifier for the track. |
Trailers
Trailers are a short 5 second clip of your video to demonstrate each of the video style options.
Create Trailers
To create trailers for a track, use the following:
curl -XPOST "https://api.rotorvideos.com/api/partner/v1/tracks/:id/trailers" \
  -H "Authorization: Bearer <insert token here>" \
  -H "Content-Type: application/json"
The above command returns JSON structured like this:
{
  "data": {
    "attributes": {
      "video_id": 56,
      "outputs": [
        {
          "id": 103,
          "title": "The Organism (Vinyl)",
          "duration": 5,
          "video_url": null,
          "style_id": 12,
          "variant_id": 36,
          "progress": 0,
          "progress_message": null,
          "aspect_ratio": "16x9"
        },
        {
          "id": 102,
          "title": "The Organism (Horizon)",
          "duration": 5,
          "video_url": null,
          "style_id": 11,
          "variant_id": 33,
          "progress": 0,
          "progress_message": null,
          "aspect_ratio": "16x9"
        }
      ]
    }
  }
}
This creates the trailers asynchronously. Use this endpoint in combination with the get trailers endpoint to identify when the trailer videos are ready.
HTTP Request
POST "https://api.rotorvideos.com/api/partner/v1/tracks/:id/trailers"
Get Trailers
To get the trailers for a track, use the following:
curl "https://rotorvideos.com/api/partner/v1/tracks/:id/trailers" \
  -H "Authorization: Bearer <insert token here>" \
  -H "Content-Type: application/json"
The above command returns JSON structured like this:
{
  "data": {
    "attributes": {
      "video_id": 56,
      "outputs": [
        {
          "id": 103,
          "title": "The Organism (Vinyl)",
          "duration": 5,
          "video_url": "https://example.com/The-Oraganism-Vinyl.mp4",
          "style_id": 12,
          "variant_id": 36,
          "progress": 100,
          "progress_message": null,
          "aspect_ratio": "16x9"
        },
        {
          "id": 102,
          "title": "The Organism (Horizon)",
          "duration": 5,
          "video_url": "https://example.com/The-Oraganism-Horizon.mp4",
          "style_id": 11,
          "variant_id": 33,
          "progress": 100,
          "progress_message": null,
          "aspect_ratio": "16x9"
        }
      ]
    }
  }
}
This gets the trailers for a track. Use this endpoint to identify when the trailer videos are ready.
HTTP Request
GET "https://api.rotorvideos.com/api/partner/v1/tracks/:id/trailers"
Styles
These ofter options to style your video based on a theme.
Get Styles
To get the available styles, use the following:
curl "https://api.rotorvideos.com/api/partner/v1/styles" \
  -H "Authorization: Bearer <insert token here>" \
  -H "Content-Type: application/json"
The above command returns JSON structured like this:
{
  "data": [
    {
      "attributes": {
        "id": 11,
        "title": "Vinyl",
        "preview": "https://example.com/style-11-preview.mp4",
        "variants": [
          {
            "id": 31,
            "title": "Landscape (16x9)",
            "preview": "https://example.com/variant-31-preview.mp4",
            "aspect_ratio": "16x9",
            "duration": 3
          },
          {
            "id": 32,
            "title": "Vertical (9x16)",
            "preview": "https://example.com/variant-32-preview.mp4",
            "aspect_ratio": "9x16",
            "duration": 3
          },
          {
            "id": 33,
            "title": "Square (1x1)",
            "preview": "https://example.com/variant-33-preview.mp4",
            "aspect_ratio": "1x1",
            "duration": 3
          }
        ]
      }
    },
    {
      "attributes": {
        "id": 12,
        "title": "Horizon",
        "preview": "https://example.com/style-12-preview.mp4",
        "variants": [
          {
            "id": 34,
            "title": "Landscape (16x9)",
            "preview": "https://example.com/variant-34-preview.mp4",
            "aspect_ratio": "16x9",
            "duration": 5
          },
          {
            "id": 36,
            "title": "Square (1x1)",
            "preview": "https://example.com/variant-36-preview.mp4",
            "aspect_ratio": "1x1",
            "duration": 5
          }
        ]
      }
    }
  ]
}
This returns all the available styles that you can choose to base your video
on. You can see a short preview each via the preview attribute.
HTTP Request
GET "https://api.rotorvideos.com/api/partner/v1/styles"
Previews
Previews are videos that are used to demonstrate the variants for a given style.
Create Previews
To create preview videos of a given style, use the following:
curl -XPOST "https://api.rotorvideos.com/api/partner/v1/tracks/:id/previews" \
  -H "Authorization: Bearer <insert token here>" \
  -H "Content-Type: application/json" \
  -d '{
    "data": {
      "attributes": {
        "style_id": 11
      }
    }
  }'
The above command returns JSON structured like this:
{
  "data": {
    "attributes": {
      "video_id": 56,
      "outputs": [
        {
          "id": 99,
          "title": "The Organism (Landscape (16x9))",
          "duration": 220,
          "video_url": null,
          "style_id": 11,
          "variant_id": 31,
          "progress": 0,
          "progress_message": null,
          "aspect_ratio": "16x9"
        },
        {
          "id": 100,
          "title": "The Organism (Vertical (9x16))",
          "duration": 220,
          "video_url": null,
          "style_id": 11,
          "variant_id": 32,
          "progress": 0,
          "progress_message": null,
          "aspect_ratio": "9x16"
        },
        {
          "id": 101,
          "title": "The Organism (Square (1x1))",
          "duration": 220,
          "video_url": null,
          "style_id": 11,
          "variant_id": 33,
          "progress": 0,
          "progress_message": null,
          "aspect_ratio": "1x1"
        }
      ]
    }
  }
}
This creates the previews asynchronously. Use this endpoint in combination with the get previews endpoint to identify when the preview videos are ready.
HTTP Request
GET "https://api.rotorvideos.com/api/partner/v1/tracks/:id/previews"
URL Parameters
| Parameter | Description |
|---|---|
| id | A unique identifier for the track. |
Data Attributes
| Parameter | Description |
|---|---|
| style_id | A unique identifier for the style you want to preview. |
Get Previews
To get the previews for a track use the following:
curl "https://rotorvideos.com/api/partner/v1/tracks/:track_id/previews/:style_id" \
  -H "Authorization: Bearer <insert token here>" \
  -H "Content-Type: application/json"
The above command returns JSON structured like this:
{
  "data": {
    "attributes": {
      "video_id": 56,
      "outputs": [
        {
          "id": 99,
          "title": "The Organism (Landscape (16x9))",
          "duration": 220,
          "video_url": "https://example.com/The-Oraganism-Landscape.mp4",
          "style_id": 11,
          "variant_id": 31,
          "progress": 100,
          "progress_message": null,
          "aspect_ratio": "16x9"
        },
        {
          "id": 100,
          "title": "The Organism (Vertical (9x16))",
          "duration": 220,
          "video_url": "https://example.com/The-Oraganism-Vertical.mp4",
          "style_id": 11,
          "variant_id": 32,
          "progress": 100,
          "progress_message": null,
          "aspect_ratio": "9x16"
        },
        {
          "id": 101,
          "title": "The Organism (Square (1x1))",
          "duration": 220,
          "video_url": "https://example.com/The-Oraganism-Square.mp4",
          "style_id": 11,
          "variant_id": 33,
          "progress": 100,
          "progress_message": null,
          "aspect_ratio": "1x1"
        }
      ]
    }
  }
}
Return the available preview videos for a track with a given style.
HTTP Request
GET "https://rotorvideos.com/api/partner/v1/tracks/:track_id/previews/:style_id"
URL Parameters
| Parameter | Description |
|---|---|
| track_id | A unique identifier for the track. |
| style_id | A unique identifier for the style. |
Final Videos
Render the final HD version of a video for a track. The variant_id will determine the aspect ratio.
Create Final Video
To create the final video for a track, use the following:
curl -XPOST "https://api.rotorvideos.com/api/partner/v1/tracks/:id/videos" \
  -H "Authorization: Bearer <insert token here>" \
  -H "Content-Type: application/json" \
  -d '{
    "data": {
      "attributes": {
        "style_id": 11,
        "variant_id": 31
      }
    }
  }'
The above command returns JSON structured like this:
{
  "data": {
    "attributes": {
      "video_id": 56,
      "outputs": [
        {
          "id": 99,
          "title": "The Organism",
          "duration": 220,
          "video_url": null,
          "style_id": 11,
          "variant_id": 31,
          "progress": 0,
          "progress_message": null,
          "aspect_ratio": "16x9"
        }
      ]
    }
  }
}
This creates the video asynchronously. Use this endpoint in combination with the get video endpoint to identify when the final video is ready.
HTTP Request
POST "https://api.rotorvideos.com/api/partner/v1/tracks/:id/videos"
Data Attributes
| Parameter | Description |
|---|---|
| style_id | A unique identifier for the style you want to render. |
| variant_id | A unique identifier for the variant you want to render. |
Get A Final Video
To get the renders for a variant use the following:
curl "https://rotorvideos.com/api/partner/v1/tracks/:id/videos/:variant_id" \
  -H "Authorization: Bearer <insert token here>" \
  -H "Content-Type: application/json"
The above command returns JSON structured like this:
{
  "data": {
    "attributes": {
      "video_id": 56,
      "outputs": [
        {
          "id": 99,
          "title": "The Organism",
          "duration": 220,
          "video_url": "https://example.com/The-Oraganism-Final.mp4",
          "style_id": 11,
          "variant_id": 31,
          "progress": 0,
          "progress_message": null,
          "aspect_ratio": "16x9"
        }
      ]
    }
  }
}
Return a final video for a given variant id.
HTTP Request
GET "https://rotorvideos.com/api/partner/v1/tracks/:id/videos/:variant_id"
URL Parameters
| Parameter | Description |
|---|---|
| id | A unique identifier for the track. |
| variant_id | A unique identifier for the variant you want to render. |
Get All Final Videos
To get all the final HD videos for a track, use the following:
curl "https://rotorvideos.com/api/partner/v1/tracks/:id/videos" \
  -H "Authorization: Bearer <insert token here>" \
  -H "Content-Type: application/json"
The above command returns JSON structured like this:
{
  "data": {
    "attributes": {
      "video_id": 56,
      "outputs": [
        {
          "id": 99,
          "title": "The Organism",
          "duration": 220,
          "video_url": "https://example.com/The-Oraganism-Landscape-Final.mp4",
          "style_id": 11,
          "variant_id": 31,
          "progress": 100,
          "progress_message": null,
          "aspect_ratio": "16x9"
        },
        {
          "id": 100,
          "title": "The Organism (Vertical (9x16))",
          "duration": 220,
          "video_url": "https://example.com/The-Oraganism-Vertical-Final.mp4",
          "style_id": 11,
          "variant_id": 32,
          "progress": 100,
          "progress_message": null,
          "aspect_ratio": "9x16"
        }
      ]
    }
  }
}
Return all rendered final videos.
HTTP Request
GET "https://rotorvideos.com/api/partner/v1/tracks/:id/videos"
URL Parameters
| Parameter | Description |
|---|---|
| id | A unique identifier for the track. |
Orders
In the Rotor Embeddable on your website, when the User wants to render (purchase) a final video, an Order is created on the Rotor API with a unique ID (UUID), in the pending state.
You can transact a purchase for this Order UUID as needed, and when the user's Order is authorized/checked out on your website, a server-to-server request is required to initiate the render of the final video, and complete the Order.
Finalize Single Order
Finalize a single Order:
curl -XPOST "https://api.rotorvideos.com/api/partner/v1/orders/:uuid/finalize" \
  -H "Authorization: Bearer <user access token>" \
  -H "Content-Type: application/json"
Response:
{
  "data": {
    "id": "49951b56-96ca-4bea-8cdb-c6875b33ce72",
    "type":"orders",
    "attributes": {
      "title": "Rite - Rotor Pretenders [CANVAS]",
      "order_paid": true,
      "created_at": "2023-06-26T12:17:47.576Z",
      "updated_at": "2023-06-26T12:18:17.215Z",
      "total_credits": 1,
      "remote_user_id": "partner-user-12345",
      "remote_track_id": "partner-track-12345",
      "remote_release_id": "partner-release-12345",
      "assets": {
        "data": [
          {
            "id": "88066362-141b-11ee-a6aa-4e8eb07e0621",
            "type": "render",
            "attributes": {
              "style_used": "High Contrast canvas",
              "error": null,
              "created_at": "2023-06-26T12:18:16.246Z",
              "updated_at":"2023-06-26T12:18:48.828Z",
              "progress":0.0,
              "url": null,
              "render_started_at":"2023-06-26T12:18:17.426Z",
              "render_completed_at": null,
              "specification": {
                "bitrate": 0,
                "container":"mp4",
                "frame_rate":30.0,
                "output_width":1080,
                "output_height":1920,
                "duration":8.0
              }
            }
          }
        ]
      }
    }
  }
}
HTTP Request
POST "https://api.rotorvideos.com/api/partner/v1/orders/:uuid/finalize"
URL Parameters
| Parameter | Description |
|---|---|
| uuid | A unique identifier for the Order. |
Finalize Multiple Orders
Finalize multiple Orders:
curl -XPOST "https://api.rotorvideos.com/api/partner/v1/orders/finalize" \
  -H "Authorization: Bearer <user access token>" \
  -H "Content-Type: application/json" \
  -d '{
    "data": {
      "type": "orders",
      "attributes":  {
        "order_uuids": [
          "49951b56-96ca-4bea-8cdb-c6875b33ce72",
          "49951b56-96ca-4bea-8cdb-c6875b44df83"
        ]
      }
    }
  }'
Response:
{
  "data": [
    {
      "id": "49951b56-96ca-4bea-8cdb-c6875b33ce72",
      "type":"orders",
      "attributes": {
        ...
      }
    },
    {
      "id": "49951b56-96ca-4bea-8cdb-c6875b44df83",
      "type":"orders",
      "attributes": {
        ...
      }
    }
  }
}
HTTP Request
POST "https://api.rotorvideos.com/api/partner/v1/orders/finalize"
Data Attributes
| Parameter | Description |
|---|---|
| order_uuids | An array of unique identifiers for the Orders. |
Get Order
GET an Order by UUID:
curl -XGET "https://api.rotorvideos.com/api/partner/v1/orders/:uuid" \
  -H "Authorization: Bearer <user access token>"
Response:
{
  "data": {
    "id": "49951b56-96ca-4bea-8cdb-c6875b33ce72",
    "type":"orders",
    "attributes": {
      ...
    }
  }
}
A single Order can be retrieved with the following request.
HTTP Request
GET "https://api.rotorvideos.com/api/partner/v1/orders/:uuid"
URL parameters
| Parameter | Description |
|---|---|
| uuid | A unique identifier for the Order. |
Get All Orders
GET all Orders:
curl -XGET "https://api.rotorvideos.com/api/partner/v1/orders" \
  -H "Authorization: Bearer <user access token>"
Response:
{
  "data": [
    {
      "id": "49951b56-96ca-4bea-8cdb-c6875b33ce72",
      "type":"orders",
      "attributes": {
        ...
      }
    },
    {
      "id": "49951b56-96ca-4bea-8cdb-c6875b33ab12",
      "type":"orders",
      "attributes": {
        ...
      }
    },
  ]
}
All Orders for a user can be retrieved with the following request.
HTTP Request
GET "https://api.rotorvideos.com/api/partner/v1/orders"
Webhooks
The Rotor API will fire webhooks to registered endpoints, per application. For example, every time an order is placed in an embeddable, and finalized, a webhook will be sent to the application's registered endpoints, that are subscribed to that event.
Webhook Endpoints
Rotor needs to know where to send events. You can register multiple webhooks with Rotor by emailing engineering@rotorvideos.com.
You will need to provide the publicly accessible HTTPS URL to your webhook endpoint, and select the type of events you’re receiving in your endpoint.
Webhook Events
Rotor API will fire webhooks for the following events:
Event: order.finalized
An example webhook payload for
order.finalized
{
  "id": "8997ae3c-1d9f-4421-9064-c2a8ab386fa0",
  "event": "order.finalized",
  "created_at": "2023-02-13 13:09:42.654463",
  "type": "order",
  "payload": {
    "data": {
      "id": "49951b56-96ca-4bea-8cdb-c6875b33ce72",
      "type":"order",
      "attributes": {
        "title": "Rite - Rotor Pretenders [CANVAS]",
        "order_paid": true,
        "created_at": "2023-06-26T12:17:47.576Z",
        "updated_at": "2023-06-26T12:18:17.215Z",
        "total_credits": 1,
        "remote_user_id": "partner-user-12345",
        "remote_track_id": "partner-track-12345",
        "remote_release_id": "partner-release-12345",
        "assets": {
          "data": [
            {
              "id": "88066362-141b-11ee-a6aa-4e8eb07e0621",
              "type": "render",
              "attributes": {
                "style_used": "High Contrast canvas",
                "error": null,
                "created_at": "2023-06-26T12:18:16.246Z",
                "updated_at":"2023-06-26T12:18:48.828Z",
                "progress":1.0,
                "url": "https://rotorvideos-heroku-production-uploads.storage.googleapis.com/output/1.mp4?1687781928",
                "render_started_at":"2023-06-26T12:18:17.426Z",
                "render_completed_at":"2023-06-26T12:18:48.216Z",
                "specification": {
                  "bitrate": 0,
                  "container":"mp4",
                  "frame_rate":30.0,
                  "output_width":1080,
                  "output_height":1920,
                  "duration":8.0
                }
              }
            }
          ]
        }
      }
    }
  }
}
When the renders for the order have been completed and uploaded to the cloud, Rotor marks the order as complete, and triggers order.finalized
Errors
The Rotor Partner API uses the following error codes:
| Error Code | Meaning |
|---|---|
| 400 | Bad Request |
| 401 | Unauthorized |
| 402 | Quota Exceeded |
| 403 | Forbidden |
| 404 | Not Found |
| 405 | Method Not Allowed |
| 406 | Not Acceptable |
| 429 | Too Many Requests |
| 500 | Internal Server Error |
| 503 | Service Unavailable |
JavaScript API
Alongside the REST API, we provide client-side libraries that embed the Rotor video creator into your own pages, so your users never leave your platform to make a video.
There are three ways to integrate. All of them use the same server-side integration and the same User Access Tokens.
| Integration | Use it when | How you get it |
|---|---|---|
| Iframe | Recommended for new integrations. Any site, with or without React. | Public npm package, or a script tag. No credentials needed. |
| React | The creator needs to run inside your own React application. | Private npm registry, using a token from your Partner Dashboard. |
| Bundle | The same, on a page that isn't a React application. | Private npm registry, using a token from your Partner Dashboard. |
The Iframe embed loads the video creator from Rotor, so you get new features and fixes without upgrading anything, and there is no application code to pull into your build. The React and Bundle libraries run the creator inside your own application, which means pinning a version of our application and its dependencies alongside yours.
Iframe
The iframe embed is the recommended way to add Rotor video creation to your site.
You install a small loader on your page. When you open it, the loader mounts the
Rotor video creator in a full-screen <iframe> served from Rotor. Because the
creator itself is served by us rather than bundled into your application, new
features and fixes reach your integration as soon as we ship them — there is no
library version to upgrade to stay current.
Installation
Install the package
npm install @rotorvideos/iframe
## or
yarn add @rotorvideos/iframe
Or add the script to the page
<!-- Replace 1.0.2 with the release you want to pin to -->
<script src="https://cdn.jsdelivr.net/npm/@rotorvideos/iframe@1.0.2/dist/rv-embeddable-iframe.min.js"></script>
@rotorvideos/iframe is published publicly to the npm registry, so it needs no
registry credentials and no .npmrc entry.
The package has no dependencies, and it does not require React — you can use it from any page, framework or not.
If you would rather not add a build step, load the script-tag bundle instead. It
exposes a ready-to-use client as the global RotorVideos, and is otherwise
identical to the package.
Quick start
A complete integration using the script-tag bundle
<!doctype html>
<html lang="en">
  <head>
    <title>Artist Dashboard</title>
    <script src="https://cdn.jsdelivr.net/npm/@rotorvideos/iframe@1.0.2/dist/rv-embeddable-iframe.min.js"></script>
  </head>
  <body>
    <button id="create-video">Make Videos</button>

    <script>
      // Your own endpoint, returning the User Access Token your server obtained
      // from POST /api/partner/v1/register for the signed-in user.
      async function getToken() {
        const response = await fetch('/my-app/rotor-token');
        const { accessToken } = await response.json();
        return accessToken;
      }

      RotorVideos.init({
        authConfig: {
          clientId: 'partner-app-client-id',
          getToken: getToken,
        },
        mediaAssets: [
          {
            id: 'partner-demo-track-1',
            providerName: 'partner-demo-api',
            artistName: 'Rotor Pretenders',
            trackName: 'Track 1',
            artworkUrl: 'https://example.com/partner-demo-1/artwork.jpg',
            audioUrl: 'https://example.com/partner-demo-1/audio.mp3',
          },
        ],
      });

      document
        .getElementById('create-video')
        .addEventListener('click', function () {
          RotorVideos.open({ providerReferenceId: 'partner-demo-track-1' });
        });
    </script>
  </body>
</html>
The same integration using the package
import { RotorVideosClient } from '@rotorvideos/iframe';

const client = new RotorVideosClient();

client.init({
  authConfig: { clientId, getToken },
  mediaAssets,
});

client.open({ providerReferenceId: 'partner-demo-track-1' });
There are two calls to make: init once, with the configuration that stays the
same for your integration, and open each time a user wants to create a video.
RotorVideosClient
Creating a client
import { RotorVideosClient } from '@rotorvideos/iframe';

const client = new RotorVideosClient();
The client owns the embed for your page. Create one and reuse it — the script-tag
bundle creates one for you and assigns it to window.RotorVideos.
| Method | Type | Description |
|---|---|---|
| init | (config: RotorVideosConfig) => void | Supply the configuration used for every launch. |
| open | (options?: OpenOptions, handlers?: Handlers) => boolean | Open the video creator. |
| close | (reason?: string) => void | Close the video creator. |
init
Example
client.init({
  authConfig: {
    clientId: 'partner-app-client-id',
    getToken: getToken,
  },
  mediaAssets: mediaAssets,
  availableFlows: [CreationFlow.lyrics, CreationFlow.artwork],
});
init takes the RotorVideosConfig that applies to every launch. Call it before
the first open.
You can call init again at any time to replace the configuration — for
instance, after the signed-in user changes, or once a user's assets have loaded.
A call to init does not affect an embed that is already open; the new
configuration applies to the next open.
RotorVideosConfig
| Prop Name | Type | Description | Required | Default |
|---|---|---|---|---|
| authConfig | AuthConfig | The authentication configuration see more | Yes | - |
| mediaAssets | MediaAsset[] | The list of available Partner assets for the user see more | No | [] |
| availableFlows | CreationFlow[] | The creation flows available to the user see more | No | All flows |
| showDuplicateAction | boolean | Show the duplicate action for a video | No | true |
| enableUnlinkedMode | boolean | Allow users to start a video without selecting one of your assets first | No | false |
| enableExternalCreate | boolean | Close the embed instead of starting creation, so your own page can handle the "create" action | No | false |
The MediaAsset shape is the same as for the React library — see
MediaAsset.
open
Example
client.open(
  { providerReferenceId: 'partner-demo-track-1' },
  {
    onReady: () => console.log('the creator is visible'),
    onClose: (reason) => console.log('closed', reason),
    onError: (message) => console.error(message),
  }
);
open mounts the video creator over your page. Both arguments are optional.
It returns true when the embed was opened, and false when an embed is
already open. A call that returns false does nothing at all — the visible
session keeps the options and handlers it was opened with.
OpenOptions
| Prop Name | Type | Description | Required | Default |
|---|---|---|---|---|
| providerReferenceId | string | The identifier of the asset to open. Must match a MediaAsset id or releaseId |
No | - |
| initialFlow | CreationFlow | The creation flow to open with. Requires the providerReferenceId |
No | - |
Handlers
| Prop Name | Type | Description |
|---|---|---|
| onReady | () => void | The creator has loaded and is visible. |
| onClose | (reason?: string) => void | The embed has closed. See the reasons below. |
| onError | (message: string) => void | The embed failed to load or reported an error. The user is shown the same message. |
Handlers apply to a single open call and are discarded when the embed closes,
so pass them again on the next launch.
onClose receives a reason describing why the embed closed:
| Reason | Meaning |
|---|---|
undefined |
The user finished or dismissed the embed normally. |
'dismissed' |
The user pressed Escape. |
'error' |
The user dismissed the error message shown after a load failure. |
'external create' |
The user asked to create a video while enableExternalCreate is set, so your page should take over. |
close
Example
client.close();
close closes the embed from your page — for example, if the user signs out
while the creator is open. It is a no-op when nothing is open.
The user can already close the embed themselves, and doing so calls your
onClose handler, so most integrations never need to call close directly.
Authentication
Example of an AuthConfig
{
  clientId: 'partner-app-client-id',
  getToken: async () => {
    const response = await fetch('/my-app/rotor-token');
    const { accessToken } = await response.json();
    return accessToken;
  },
}
The authConfig object identifies your integration and supplies User Access
Tokens on demand.
| Prop Name | Type | Description | Required | Default |
|---|---|---|---|---|
| clientId | string | The client ID for the partner application. | Yes | - |
| getToken | () => string | Promise<string> | Returns a User Access Token for the signed-in user. | Yes | - |
getToken is called whenever the embed needs a token, including when the
previous one has expired. Return the current token for the signed-in user each
time it is called — do not cache one indefinitely on the assumption it will
remain valid. See Authentication for how your server obtains
a User Access Token, and how long it lasts.
Your getToken function stays on your page. It is never sent to Rotor: the
embed asks for a token when it needs one, and only the resulting token string is
handed over.
Creation Flows
Example of how to specify the flows available
import { CreationFlow } from '@rotorvideos/iframe';

client.init({
  authConfig: authConfig,
  mediaAssets: mediaAssets,
  availableFlows: [CreationFlow.lyrics, CreationFlow.artwork],
});
There are several kinds of video your users can create. By default they can
create all of them; set availableFlows to offer a subset.
CreationFlow.canvas— Spotify Canvas videoCreationFlow.motion— Apple Music Album MotionCreationFlow.artwork— Artwork videoCreationFlow.lyrics— Lyric video
The CreationFlow values are plain strings, so the script-tag bundle can use
them directly — availableFlows: ['lyrics', 'artwork'] is equivalent to the
example above.
Going live
Two things must be in place before the embed will load on your production site.
Register your origins
Because the embed runs framed on your page, we restrict which origins are allowed to frame each production integration.
Send Rotor the exact origins your integration will be served from — scheme,
host, and port, for example https://app.example.com — and we will register
them against your Client ID.
Content Security Policy
The one directive to add
Content-Security-Policy: frame-src https://embed.rotorvideos.com;
Everything the creator loads — our application, our API, the payment SDK — runs
inside the iframe on Rotor's origin and is governed by Rotor's own Content
Security Policy, not yours. So if your page sends a Content-Security-Policy
header, you only need to allow the embed host as a frame source.
Add child-src alongside frame-src if you support browsers that predate
CSP Level 3.
The loader adds no inline <script> and no inline <style> to your page, so it
does not require 'unsafe-inline' or 'unsafe-eval'.
Differences from the React and Bundle libraries
If you are moving from @rotorvideos/react or @rotorvideos/web, note that:
- Configuration is split. What was one set of props is now the
initconfiguration (stable, per-integration) and theopenoptions (per-launch). availableFlowsreplacescreationFlows, andinitialFlowreplacescreationFlow.- Authentication is always a
getTokencallback. There is no staticaccessTokenoption, because the embed refreshes tokens on its own. - There is no smart button. Render your own button and call
openfrom it.
React
Installation
Add NPM Registry token to your
.npmrcfile
@rotorvideos:registry=https://us-npm.pkg.dev/rotor-lf-client/rotor-lf-npm/
//us-npm.pkg.dev/rotor-lf-client/rotor-lf-npm/:_password="<insert token here>"
//us-npm.pkg.dev/rotor-lf-client/rotor-lf-npm/:username=_json_key_base64
//us-npm.pkg.dev/rotor-lf-client/rotor-lf-npm/:email=not.valid@email.com
//us-npm.pkg.dev/rotor-lf-client/rotor-lf-npm/:always-auth=true
Install the package
npm install @rotorvideos/react
## or
yarn add @rotorvideos/react
To install the package, you need to add the NPM Registry token to your .npmrc file. You can find the token in your
Partner Dashboard (Engineering -> JavaScript Integration). And then you can install the package using npm or yarn.
RotorVideosProvider
Example
import { RotorVideosProvider } from '@rotorvideos/react';

const App = () => {
  return (
    <RotorVideosProvider
      authConfig={{
        accessToken,
        clientId,
      }}
      theme={customTheme}
    >
      ...
    </RotorVideosProvider>
  );
}
Wrap your application with the RotorVideosProvider component to provide the necessary configuration for the Rotor
Videos components.
Parameters
| Prop Name | Type | Description | Required | Default |
|---|---|---|---|---|
| authConfig | AuthConfig | The authentication configuration | Yes | - |
| mediaAssets | MediaAsset[] | The list of available Partner assets for the user. | No | [] |
| availableTracks | MediaAsset[] | Deprecated, please use mediaAssets instead |
No | [] |
| children | ReactNode | The children components to be wrapped by the provider. | Yes | - |
| creationFlows | (motion,canvas)[] | The list of available creation flows for the user. | No | [CreationFlow.canvas, CreationFlow.lyrics, CreationFlow.motion, CreationFlow.artwork] |
| showDuplicateAction | boolean | Show the duplicate action for the Video | No | true |
| logLevel | quiet,debug | The console log level | No | quiet |
| theme | AppTheme | The theme overrides object see more | No | - |
AuthConfig
Supplying a token on demand (recommended)
<RotorVideosProvider
  authConfig={{
    clientId: 'partner-app-client-id',
    getToken: async () => {
      const response = await fetch('/my-app/rotor-token');
      const { accessToken } = await response.json();
      return accessToken;
    },
  }}
>
  ...
</RotorVideosProvider>
Supplying a fixed token
{
  "accessToken": "user-access-token",
  "clientId": "partner-app-client-id"
}
The authConfig object contains the necessary information to authenticate the user with the Rotor Videos API.
It takes one of two forms.
Prefer the getToken form. User Access Tokens expire, and getToken is called
again whenever a fresh one is needed, so your integration keeps working through
an expiry without you having to re-render the provider.
| Prop Name | Type | Description | Required | Default |
|---|---|---|---|---|
| clientId | string | The client ID for the partner application. | Yes | - |
| getToken | () => Promise<string> | Returns a User Access Token for the user. Called again whenever one is needed. | Yes, unless accessToken is given |
- |
| accessToken | string | A fixed access token for the user. Not refreshed — use getToken instead. |
Yes, unless getToken is given |
- |
MediaAsset
Example of a track asset
{
  "id": "partner-demo-track-1",
  "providerName": "partner-demo-api",
  "trackName": "Rite",
  "artistName": "Rotor Pretenders",
  "audioUrl": "https://example.com/partner-demo-1/audio.mp3",
  "artworkUrl": "https://example.com/partner-demo-1/artwork.jpg",
  "releaseId": "partner-demo-release-1",
  "releaseName": "Some Are Lovin'",
  "releaseType": "album",
  "releaseArtworkUrl": "https://example.com/partner-demo-1/release-1-artwork.jpg"
}
Example of a release asset
{
  "providerName": "partner-demo-api",
  "releaseId": "partner-demo-release-2",
  "releaseName": "Rotor Pretenders Debut",
  "releaseType": "single",
  "releaseArtworkUrl": "https://example.com/partner-demo-1/release-2-artwork.jpg"
}
A MediaAsset represents an asset available for the user to select. There are
two shapes, and the fields you send decide which one you get:
- A track asset has an
id. It imports the track's audio and artwork, and may also carry the details of the release it belongs to. - A release asset has no
idand areleaseId. It imports the release only.
A track asset and a release asset may carry the same releaseId. Releases are
matched on providerName and releaseId, so both assets resolve to the same
release rather than creating a duplicate.
Track asset
| Prop Name | Type | Description | Required |
|---|---|---|---|
| id | string | Your unique identifier for the track. Open the embeddable with this value. | Yes |
| providerName | string | The name of the media asset provider. | Yes |
| trackName | string | The name of the track. | Yes |
| artistName | string | The name of the track's artist. | Yes |
| audioUrl | string | The URL of the track's audio file. | Yes |
| artworkUrl | string | The URL of the track's artwork. | No |
| releaseId | string | Your unique identifier for the release. Supplying it also imports the release. | No |
| releaseName | string | The name of the release. | No |
| releaseType | album, compilation, ep, single | The type of the release. | No |
| releaseArtworkUrl | string | The URL of the release's artwork. | No |
Release asset
| Prop Name | Type | Description | Required |
|---|---|---|---|
| providerName | string | The name of the media asset provider. | Yes |
| releaseId | string | Your unique identifier for the release. Open the embeddable with this value. | Yes |
| releaseName | string | The name of the release. | No |
| releaseType | album, compilation, ep, single | The type of the release. | No |
| releaseArtworkUrl | string | The URL of the release's artwork. | No |
| artistName | string | The name of the release's artist. | No |
Media requirements
Assets are imported server side, so every URL you supply has to be fetchable
without authentication — we send a HEAD request before downloading the file.
Pre-signed URLs are fine, but they must stay valid until the import finishes,
not just for as long as your page is open.
- Audio format — WAV, MP3, M4A, AAC, OGG, FLAC or AIFF
- Audio length — under 10 minutes
- Audio size — 300 MB or less
- Artwork format — JPEG, PNG, GIF or TIFF
Creation Flows
There are various media types your users can create: Apple Music Album Motion, Spotify Canvas Video, Lyric Video, and Artwork Video. By default, all creation flows are available to users. However, you can customize which flows appear by configuring the creationFlows prop in the RotorVideosProvider when integrating our toolkit into your React app.
How Creation Flows Work
- Creation flows control which media types will be available for your users to create.
- By customizing the
creationFlowsprop, you choose exactly which flows are available. - Empty array (
[]): All flows are enabled (default behavior). - Specific entries: Only the flows listed will be enabled.
Available Creation Flows
CreationFlow.canvas— Spotify Canvas videoCreationFlow.motion— Apple Music Album MotionCreationFlow.artwork— Artwork videoCreationFlow.lyrics— Lyric video
Here's how to use the creationFlows prop when integrating the provider into your React app:
Example of how to specify the creationFlows available
<RotorVideosProvider
  {...rotorVideosConfig}
  mediaAssets={compactReleases}
  theme={releasesDemoTheme}
  creationFlows={[CreationFlow.motion, CreationFlow.canvas]}
  showDuplicateAction={false}
>
  {/* Your app content */}
</RotorVideosProvider>
useRotorVideos
Example
import { useRotorVideos } from '@rotorvideos/react';

const MyComponent = () => {
  const { open } = useRotorVideos();

  return (
    <div>
      <button onClick={() => open({ providerReferenceId: 'partner-demo-track-1' })}>
        Create Video
      </button>
    </div>
  );
}
The useRotorVideos hook provides access to the Rotor Videos context. It returns the following properties:
| Prop Name | Type | Description |
|---|---|---|
| open | (options: OpenOptions?) => void | The function to open the Rotor Videos modal. |
| close | () => void | The function to close the Rotor Videos modal. |
OpenOptions
OpenOptions Example
{
  providerReferenceId: 'partner-demo-track-1';
}
The OpenOptions object contains the necessary information to open the Rotor Videos modal. It is defined as follows:
| Prop Name | Type | Description | Required | Default |
|---|---|---|---|---|
| providerReferenceId | string | The identifier of the asset to open. Must match a MediaAsset id or releaseId |
No | null |
| creationFlow | canvas,motion | The creation flow to open the modal with. Requires the providerReferenceId |
No | null |
RotorVideosSmartButton
Example
import { RotorVideosProvider, RotorVideosSmartButton } from '@rotorvideos/react';

const App = () => (
  <RotorVideosProvider {...options}>
    <RotorVideosSmartButton providerReferenceId="partner-demo-track-1" />
  </RotorVideosProvider>
);
Example button label states
- `Loading...` when the track is being imported
- `Failed to load!` when the track failed to import
- `Your Videos ({{count}})` when the track already has videos
- `Make Videos` when the track is ready to create videos
The RotorVideosSmartButton component is a button that opens the Rotor Videos modal when clicked.
Parameters
| Prop Name | Type | Description | Required | Default |
|---|---|---|---|---|
| providerReferenceId | string | The identifier of the asset to open. Must match a MediaAsset id or releaseId |
Yes | - |
| as | ElementType | The element type of the button (HTML tag or React component) | No | 'button' |
The rest of the props are passed to the button element.
import { RotorVideosProvider, RotorVideosSmartButton } from '@rotorvideos/react';

// NOTE: Take implementation as an example. Please be responsible in handling your credentials for your app.
const App = () => {
  const authConfig = {
    accessToken: 'user-access-token',
    clientId: 'partner-app-client-id',
  };

  // SAMPLE DATA
  const mediaAssets = [
    {
      id: 'partner-demo-track-1',
      providerName: 'partner-demo-api',
      trackName: 'Track 1',
      artistName: 'Artist Name',
      audioUrl: 'https://example.com/audio.mp3',
      artworkUrl: 'https://example.com/artwork.jpg',
    }
  ];

  return (
    <RotorVideosProvider
      authConfig={authConfig}
      mediaAssets={mediaAssets}
    >
      {mediaAssets.map((asset) => (
        <RotorVideosSmartButton key={asset.id} providerReferenceId={asset.id} />
      ))}
    </RotorVideosProvider>
  );
};
Bundle
Installation
Add the script to the page
<html lang="en">
  <head>
    <title>App</title>
  </head>
  <body>
    <script src="rv-embeddable-1.0.0.js"></script>
    <script>
      // Use the Rotor Embeddable here
    </script>
  </body>
</html>
In order to download the JavaScript bundle, follow the steps below:
- Follow the steps in the React section to get the necessary credentials, obtain NPM Auth Token and create
a
.npmrcfile. - In an empty folder run
npm init -yto create a newpackage.jsonfile. - Run
npm pack @rotorvideos/web && tar -xzf *.tgzto download the JavaScript bundle. - In the
package/distfolder, you will find therv-embeddable-1.0.0.jsfile.
In fact, the bundle uses React version of the Rotor Embeddable, with slightly different interface. See the React section for more information.
Usage
Example
const commonConfig = {
  authConfig: {
    accessToken: 'your-access-token',
    clientId: 'your-client-id',
  },
  mediaAssets: [
    {
      id: 'partner-demo-track-1',
      providerName: 'partner-demo-api',
      artistName: 'Rotor Pretenders',
      releaseId: 'partner-demo-release-1',
      releaseType: 'single',
      releaseName: 'Rotor Pretenders Debut Album',
      releaseArtworkUrl: 'https://example.com/partner-demo-1/release-1-artwork.jpg',
      trackName: 'Track 1',
      artworkUrl: 'https://example.com/partner-demo-1/artwork.jpg',
      audioUrl: 'https://example.com/partner-demo-1/audio.mp3'
    },
  ],
};

RotorVideos.open({
  ...commonConfig,
  providerReferenceId: 'partner-demo-track-1',
});
The bundle exposes a global object RotorVideos that you can use to interact with the embeddable. It has the following methods:
| Prop Name | Type | Description |
|---|---|---|
| open | (options: GlobalOpenOptions) => void | The function to open the Rotor Videos modal. |
| close | () => void | The function to close the Rotor Videos modal. |
| smartButton | (element: Element, props: RotorVideosSmartButtonProps): void | The function to create a theme for the Rotor Videos components. |
RotorVideos.open
GlobalOpenOptions Definition
type GlobalOpenOptions = RotorVideosProviderOptions & { providerReferenceId: string };
The RotorVideos.open method opens the Rotor Embeddable with the given configuration.
It accepts an object with the same properties as the React's RotorVideosProvider
and an additional providerReferenceId property, to open the embeddable for a specific track.
RotorVideos.close
The RotorVideos.close method closes the Rotor Embeddable.
RotorsVideos.smartButton
Example
RotorVideos.smartButton(document.getElementById('div'), {
  providerReferenceId: 'partner-demo-track-1',
  as: 'button'
});
The RotorVideos.smartButton method creates a button in given DOM element that opens the Rotor Embeddable
with the same properties as the React's RotorVideosSmartButton.
Theming
Default theme
Default Rotor Theme
export default {
  dimensions: {
    appbarHeight: '8.4em',
    appbarHeightClips: '8.4em',
    appHeaderHeight: '8.4em',
    appHeaderMobileHeight: '6.8em',
    mobileFixedFooterHeight: '8.4em',
    wizardLayout: {
      actionsHeight: '9.4em',
      optionsWidth: {
        md: '36em',
        lg: '42em',
        xl: '48em'
      }
    }
  },
  fontFamily: {
    regular: 'neue-haas-grotesk-text, -apple-system, BlinkMacSystemFont, "Segoe UI", Roboto, Helvetica, Arial, sans-serif, "Apple Color Emoji", "Segoe UI Emoji", "Segoe UI Symbol"',
    display: 'neue-haas-grotesk-display, -apple-system, BlinkMacSystemFont, "Segoe UI", Roboto, Helvetica, Arial, sans-serif, "Apple Color Emoji", "Segoe UI Emoji", "Segoe UI Symbol"',
    titling: 'titling-gothic-fb, -apple-system, BlinkMacSystemFont, "Segoe UI", Roboto, Helvetica, Arial, sans-serif, "Apple Color Emoji", "Segoe UI Emoji", "Segoe UI Symbol"',
    titlingBold: 'titling-gothic-fb-wide, -apple-system, BlinkMacSystemFont, "Segoe UI", Roboto, Helvetica, Arial, sans-serif, "Apple Color Emoji", "Segoe UI Emoji", "Segoe UI Symbol"',
    monospace: 'Menlo, Monaco, Consolas, "Liberation Mono", "Courier New", monospace'
  },
  palette: {
    grayscale: {
      0: '#ffffff',
      10: '#e7e7e7',
      20: '#d2d2d2',
      30: '#bbbbbb',
      40: '#a5a5a5',
      50: '#8e8e8e',
      60: '#787878',
      70: '#616161',
      80: '#4b4b4b',
      90: '#343434',
      100: '#1e1e1e',
      110: '#0f0f0f'
    },
    text: {
      default: '#fff',
      inverse: '#1e1e1e',
      white: '#fff',
      black: '#1e1e1e'
    },
    backgrounds: {
      default: '#1e1e1e',
      inverse: '#fff',
      white: '#fff',
      black: '#1e1e1e'
    },
    brand: {
      primary: '#00bad8',
      secondary: '#f15c99',
      hotpink: '#eb2782',
      facebook: '#3b5998',
      twitter: '#5ea9dd',
      google: '#4285f4',
      youtube: '#e5272b',
      vimeo: '#1eb6e9',
      spotify: '#1db954',
      soundcloud: '#f50'
    },
    utility: {
      info: '#0192d0',
      error: '#da1e28',
      success: '#37cd7d',
      warning: '#fef3cd'
    }
  },
  zIndex: {
    floatingActionButton: 120,
    notification: 120,
    clipDrawerBackdrop: 160,
    stickyHeader: 160,
    clipDrawer: 170,
    activeUploads: 190,
    footer: 500,
    sidebar: 550,
    popout: 600,
    header: 700,
    modalOverlay: 1050,
    modalContent: 1060,
    popoverContent: 1070,
    menuContent: 1080,
    tooltip: 1090,
    flashMessage: 2000
  },
  components: {
    AudioPlayer: {
      theme: {
        primaryColor: '#fff',
        backgroundColor: 'transparent',
        barColor: '#fff',
        timeColor: 'rgba(255, 255, 255, 0.7)',
      },
    },
    Button: {
      theme: {
        borderRadius: '100em',
        borderRadiusAlt: '5px',
        fontFamily:
            'neue-haas-grotesk-display, -apple-system, BlinkMacSystemFont, "Segoe UI", Roboto, Helvetica, Arial, sans-serif, "Apple Color Emoji", "Segoe UI Emoji", "Segoe UI Symbol"',
        fontSize: {
          xs: '1em',
          sm: '1.2em',
          md: '1.4em',
          lg: '1.6em',
          xl: '1.8em',
          xxl: '2em',
          xxxl: '2.2em',
        },
        fontWeight: '600',
        gap: '0.8em',
        height: '3em',
        heightTall: '4.4em',
        lineHeight: '1',
        outline: '0',
        outlineOffset: '0',
        paddingInline: '1.6em',
        paddingInlineWide: '3.2em',
        palette: {
          label: '#fff',
          labelInverse: '#1e1e1e',
          primary: '#00bad8',
          primaryHover: '#00A1BF',
          primaryActive: '#00A1BF',
          primaryFocus: '#00A1BF',
          primaryFocusOutline: '#00A1BF',
          primaryHoverFocus: '#00A1BF',
          secondary: '#f15c99',
          secondaryHover: '#D84380',
          secondaryActive: '#D84380',
          secondaryFocus: '#D84380',
          secondaryFocusOutline: '#D84380',
          secondaryHoverFocus: '#D84380',
          tertiary: '#fff',
          tertiaryBorder: '#1e1e1e',
          tertiaryLabel: '#1e1e1e',
          tertiaryLabelInverse: '#fff',
          tertiaryHover: '#1e1e1e',
          tertiaryActive: '#1e1e1e',
          tertiaryFocus: '#fff',
          tertiaryFocusOutline: '#1e1e1e',
          tertiaryHoverFocus: '#1e1e1e',
        },
        transition:
            'background-color 250ms cubic-bezier(0.4, 0, 0.2, 1) 0ms, box-shadow 250ms cubic-bezier(0.4, 0, 0.2, 1) 0ms, border-color 250ms cubic-bezier(0.4, 0, 0.2, 1) 0ms, color 250ms cubic-bezier(0.4, 0, 0.2, 1) 0ms',
      },
    },
    MenuItem: {
      theme: {
        color: 'rgba(255, 255, 255, 0.9)',
        activeBackgroundColor: '#000',
      },
    },
    RangeInput: {
      theme: {
        trackColor: '#28d3ea',
        trackBgColor: '#979797',
        trackHeight: '4px',
        thumbColor: '#bef2f9',
        thumbSize: '12px',
      },
    },
    Slider: {
      theme: {
        navigationSize: '3em',
        navigationColor: '#fff',
        paginationSize: '.8em',
        paginationColor: '#fff',
      },
    },
  },
}
The theme object provided to the RotorVideosProvider contains the styling configuration for
the Rotor Videos components. When it is not empty,
the resulted theme is a combination of provided and default theme. The merging of the two themes uses deep merge, so you
can override any part of the default theme.
Theme Components
Theme Components Definition
type ThemeProps = { theme: AppTheme; };
type ComponentStyle<ComponentProps = Record<string, any>> = Interpolation<ThemeProps & ComponentProps>;
type ComponentThemeData<ThemeDataProps = Record<string, any>> = ThemeDataProps | ((theme: AppTheme) => ThemeDataProps);

type GenericThemeComponents = Record<
  string,
  {
    theme?: ComponentThemeData;
    defaultProps?: Record<string, any>;
    styleOverrides?: Record<
      string,
      ComponentStyle
    >;
  }
>;
Theme Components Examples
const theme = {
  ...,
  components: {
    StyleGroupTabs: {
      styleOverrides: {
        // Component with custom props
        StyleGroupTabsItem: ({ theme, active }) => {
          if (active) {
            return {
              color: theme.palette.text.inverse,
              '&:after': {
                backgroundColor: theme.palette.text.inverse,
              },
            };
          }
        },
      },
    },
    VideoCard: {
      // Theme as a function
      theme: (theme) => ({
        backgroundColor: theme.palette.backgrounds.inverse,
        textColor: theme.palette.text.inverse,
      }),
    },
    VideoCardDownloadButton: {
      // Override default props
      defaultProps: {
        color: 'primary',
      },
    },
    VideoPlayerControls: {
      // Override styles with theme
      styleOverrides: {
        VideoPlayerControlsRoot: ({ theme }) => ({
          backgroundColor: theme.palette.backgrounds.black,
        }),
      },
    },
    WizardStep: {
      styleOverrides: {
        // Override styles as an object
        WizardStepMeta: {
          opacity: 1,
        },
      },
    },
  }
}
Theme Components Properties
type ThemeComponents = {
  ActionButton: {
    defaultProps: {
      color: ButtonColor,
    },
  },
  AffectedVideos: {
    defaultProps: {
      showVideosList: boolean,
    },
  },
  AlbumMotionArtworkAsset: {
    styleOverrides: {
      AlbumMotionArtworkAssetInfo: ComponentStyle
    },
  },
  AlbumMotionArtworkButton: {
    defaultProps: {
      showIcon: boolean,
      color: ButtonColor,
    },
  },
  AlbumMotionArtworkUploaderIdle: {
    styleOverrides: {
      AlbumMotionArtworkUploaderInfo: ComponentStyle
    },
  },
  AudioPlayer: {
    theme: ComponentThemeData<{
      primaryColor: string,
      backgroundColor: string,
      barColor: string,
      timeColor: string,
    }>,
  },
  Button: {
    theme: ComponentThemeData<{
      borderRadius: string,
      borderRadiusAlt: string,
      fontFamily: string,
      fontSize: {
        xs: string,
        sm: string,
        md: string,
        lg: string,
        xl: string,
        xxl: string,
        xxxl: string,
      },
      fontWeight: string,
      gap: string,
      height: string,
      heightTall: string,
      lineHeight: string,
      outline: string,
      outlineOffset: string,
      paddingInline: string,
      paddingInlineWide: string,
      palette: {
        label: string,
        labelInverse: string,
        primary: string,
        primaryHover: string,
        primaryActive: string,
        primaryFocus: string,
        primaryFocusOutline: string,
        primaryHoverFocus: string,
        secondary: string,
        secondaryHover: string,
        secondaryActive: string,
        secondaryFocus: string,
        secondaryFocusOutline: string,
        secondaryHoverFocus: string,
        tertiary: string,
        tertiaryBorder: string,
        tertiaryLabel: string,
        tertiaryLabelInverse: string,
        tertiaryHover: string,
        tertiaryActive: string,
        tertiaryFocus: string,
        tertiaryFocusOutline: string,
        tertiaryHoverFocus: string,
      },
      transition: string,
    }>,
  },
  CanvasCartActionButton: {
    defaultProps: {
      color: ButtonColor,
    },
  },
  CanvasWizardFooter: {
    styleOverrides: {
      CanvasWizardFooterPreview: ComponentStyle
    },
  },
  CarouselViewAllLink: {
    styleOverrides: {
      CarouselViewAllLinkRoot: ComponentStyle
    },
  },
  ClipCustomizationEditButton: {
    defaultProps: {
      showIcon: boolean,
      color: ButtonColor,
    },
  },
  ClipsLibraryPage: {
    styleOverrides: {
      ClipsLibraryMobileSearchLink: ComponentStyle
    },
  },
  ClipsSearchBox: {
    styleOverrides: {
      ClipsSearchBoxInput: ComponentStyle
    },
  },
  ClipsSelectorCloseButton: {
    defaultProps: {
      useIcon: boolean,
    },
  },
  ClipsTabs: {
    styleOverrides: {
      ClipsTabsRoot: ComponentStyle
      ClipsTabsLink: ComponentStyle
    },
  },
  ClipsUploader: {
    styleOverrides: {
      ClipsMobileButton: ComponentStyle
    },
  },
  ClipsUploaderBrowseButton: {
    defaultProps: {
      showIcon: boolean,
      color: ButtonColor,
    },
  },
  CompactWizardContainer: {
    styleOverrides: {
      CompactWizardContainerRoot: ComponentStyle
    },
  },
  CreateVideoModal: {
    styleOverrides: {
      CreateVideoModalRoot: ComponentStyle
      CreateVideoOption: ComponentStyle
      CreateVideoOptionTitle: ComponentStyle
      CreateVideoOptionIconWrapper: ComponentStyle<{ creationFlow: CreationFlow }>,
    },
  },
  CropAdjustmentFrame: {
    defaultProps: {
      alwaysEditing: boolean,
    },
  },
  CropDragHandle: {
    styleOverrides: {
      CropDragHandleInner: ComponentStyle
    },
  },
  DialogModal: {
    defaultProps: {
      mode: 'light' | 'dark',
    },
  },
  FileUploadCard: {
    defaultProps: {
      showHelp: boolean,
    },
    styleOverrides: {
      FileUploadCardRoot: ComponentStyle
      FileUploadCardIcon: ComponentStyle
      FileUploadCardDropzone: ComponentStyle
    },
  },
  FileUploader: {
    defaultProps: {
      enabledLegalNotice: true,
    },
  },
  FileUploaderCard: {
    styleOverrides: {
      FileUploaderCardRoot: ComponentStyle,
    },
  },
  FileUploaderCardDragging: {
    defaultProps: {
      small: boolean,
    },
  },
  FileUploaderCopyright: {
    styleOverrides: {
      FileUploaderCopyrightCancelButton: ComponentStyle,
    },
  },
  FileUploaderDragOverlay: {
    styleOverrides: {
      FileUploaderDragOverlayRoot: ComponentStyle,
    },
  },
  Flash: {
    styleOverrides: {
      FlashContainer: ComponentStyle,
    },
  },
  FullscreenModal: {
    styleOverrides: {
      FullscreenModalRoot: ComponentStyle,
    },
  },
  Header: {
    styleOverrides: {
      HeaderRoot: ComponentStyle,
    },
  },
  MenuItem: {
    theme: ComponentThemeData<{
      color: string,
      activeBackgroundColor: string,
    }>
  },
  ModalContent: {
    styleOverrides: {
      ModalContentRoot: ComponentStyle,
    },
  },
  ModalHeader: {
    theme: ComponentThemeData<{
      backgroundColor: string,
      textColor: string,
      borderColor: string,
    }>,
  },
  MoodCard: {
    styleOverrides: {
      MoodCardRoot: ComponentStyle<{ state: 'tab-item' | 'list-item' }>,
    },
  },
  NewVideoCard: {
    styleOverrides: {
      NewVideoCardRoot: ComponentStyle,
    },
  },
  NextPageButton: {
    styleOverrides: {
      NextPageButtonContent: ComponentStyle,
    },
  },
  OrderCanvasContent: {
    theme: ComponentThemeData<{
      backgroundColor: string,
      textColor: string,
      borderColor: string,
    }>,
  },
  PreviewModal: {
    styleOverrides: {
      PreviewModalCloseButton: ComponentStyle,
    },
  },
  RangeInput: {
    theme: ComponentThemeData<{
      trackColor: string,
      trackBgColor: string,
      trackHeight: string,
      thumbColor: string,
      thumbSize: string,
    }>,
  },
  RotorLoadingIcon: {
    defaultProps: Partial<RotorLoadingIconStyleProps>,
  },
  SelectedClipCard: {
    styleOverrides: {
      SelectedClipCardRoot: ComponentStyle,
      SelectedClipCardOverlay: ComponentStyle,
      SelectedClipCardFooter: ComponentStyle
    },
  },
  SelectedClipsList: {
    styleOverrides: {
      SelectedClipsListRoot: ComponentStyle,
    },
  },

  Slider: {
    theme: ComponentThemeData<{
      navigationSize: string,
      navigationColor: string,
      paginationSize: string,
      paginationColor: string,
    }>,
  },
  StyleCard: {
    styleOverrides: {
      StyleCardTitle: ComponentStyle,
      StyleCardThumb: ComponentStyle,
    },
  },
  StyleGroupTabs: {
    styleOverrides: {
      StyleGroupTabsItem: ComponentStyle<{ active: boolean }>,
    },
  },
  ToggleClipSelectionButton: {
    theme: ComponentThemeData<{
      color: string,
    }>,
  },
  UploadsPage: {
    styleOverrides: {
      UploadsPageContent: ComponentStyle,
    },
  },
  VideoCard: {
    theme: ComponentThemeData<{
      backgroundColor: string,
      textColor: string,
    }>,
  },
  VideoCardActions: {
    defaultProps: {
      color: ButtonColor,
      variant: ButtonVariant,
    },
  },
  VideoCardCartActionButton: {
    defaultProps: {
      color: ButtonColor,
      variant: ButtonVariant,
    },
  },
  VideoCardDownloadButton: {
    defaultProps: {
      color: ButtonColor,
    },
  },
  VideoPlayerControls: {
    styleOverrides: {
      VideoPlayerControlsRoot: ComponentStyle,
    },
  },
  WizardAsset: {
    styleOverrides: {
      WizardAssetTitle: ComponentStyle,
    },
  },
  WizardStep: {
    styleOverrides: {
      WizardStepIcon: ComponentStyle<{ expanded: boolean }>,
      WizardStepTitle: ComponentStyle,
      WizardStepToggleTitle: ComponentStyle<{ expanded: boolean }>,
      WizardStepMeta: ComponentStyle,
    },
  },
}
The components property of the theme object is a record of components that can be styled. Each component can have the following properties:
theme: This property is used to define the theme-specific styles for the component. If it's a function, it can use the current theme to compute the styles.defaultProps: This property is used to define and override the default props for the component.styleOverrides: This property is used to define and override the styles for the children styled components.
Localization
Localization resources
Definitions
type Language = string;
type Namespace = string;
type LocalisationResources = Record<Language, Record<Namespace, any>>;
Default Localizations
{
  "en": {
    "general": {
      "retry": "Try again",
      "close": "Close",
      "or": "or",
      "general_error_message": "Something went wrong",
      "general_error_message_with_refresh": "Something went wrong. Please refresh the page.",
      "premium_clip": "Premium Clip",
      "premium_collection": "Premium Collection",
      "play": "Play",
      "view": "View",
      "view_all": "View all",
      "back": "Back",
      "done": "Done",
      "new": "New",
      "clips": "Clips",
      "beta": "Beta",
      "remove": "Remove",
      "use": "Use",
      "images": "Images",
      "next": "Next",
      "go_back": "Go back",
      "delete": "Delete",
      "video": {
        "progress": {
          "label": "Video in progress",
          "percentage": "{{totalProgress}}% complete"
        },
        "status": {
          "draft": "Draft"
        },
        "card_actions": {
          "menu_label": "More",
          "delete": "Delete",
          "duplicate": "Duplicate",
          "download_video": "{{aspectRatio}} Video"
        },
        "page_title": "Your Videos",
        "create_video_button": "Create New Video",
        "show_more_button": "Show more videos"
      },
      "processing_audio": "Processing audio...",
      "download": "Download",
      "cart": {
        "added": "Added to cart ✅",
        "open": "Open cart",
        "add": "Add to cart"
      },
      "canvas_page_title": "Canvas Video",
      "album_motion_page_title": "Album Motion Video",
      "create_video_dialog": {
        "title": "What do you want to create?",
        "album_motion_video": "Apple Artwork",
        "canvas_video": "Spotify Canvas Video"
      },
      "delete_video_dialog": {
        "loading": "Deleting...",
        "title": "Are you sure you want to delete this video?"
      },
      "order": {
        "duplicate_button": "Make another version",
        "purchased_note": "You've purchased this video",
        "cart_note": "Your Canvas Video has been added to the cart",
        "download_button": "Download video",
        "remove_from_cart_button": "Remove from cart",
        "page_title": "Order confirmation #{{outputId}}"
      },
      "smart_button": {
        "error_label": "Failed to load!",
        "loading_label": "Loading...",
        "videos_label": "Your Videos ({{count}})",
        "make_videos_label": "Make Videos"
      }
    },
    "album_motion": {
      "asset_step": {
        "artwork_alt": "Selected artwork",
        "browse_uploads": "Browse your uploads",
        "change_artwork": "Change Artwork",
        "guideline_notice": "Please read <2>apple’s guidelines</2> to ensure your artwork is accepted",
        "square_title": "1:1 Artwork",
        "upload_info": "Recommended Size 3840px x 3840px",
        "upload_label": "Drop an image here",
        "wizard_title": "Step 1: Add Artwork",
        "upload_error": "Please upload a square image"
      },
      "style_step": {
        "wizard_title": "Step 2: Choose Style"
      }
    },
    "canvas": {
      "applying_loading": "Applying...",
      "wizard_heading": "Create Your Canvas",
      "looping_mode_step": {
        "title": "Choose Looping Mode",
        "description": "Select hard or seamless video looping"
      },
      "preview_button": "Preview Canvas",
      "customization": {
        "edit_button": "Edit snippet",
        "title": "Select Snippet",
        "subtitle": "Position the crop and select a 3-8 second snippet of the video",
        "description": "Canvas videos are vertical and 3 to 8 seconds long",
        "submit_button": "Use Snippet"
      },
      "upload": {
        "choose_file": "Select a video clip from your device",
        "choose_clip": "Choose a clip from our extensive library",
        "drop_file": "Drop a video clip here",
        "browse_library": "Browse our clip library"
      },
      "audio": {
        "choose_file_tooltip": "Click to add your audio",
        "alert_message": "Heads up: Your final Canvas video won't contain any audio",
        "alert_details_link": "Find out why →",
        "alert_confirm_button": "Ok, got it",
        "remove": "Remove Audio",
        "upload": "Upload"
      },
      "applying_style": "Applying {{style}} Style",
      "error_message": "Choose a different clip or style and try again",
      "track": {
        "title_placeholder": "Your Song Title",
        "artist_name_placeholder": "Artist Name",
        "add_details": "Add your track details"
      },
      "preview_type": {
        "video": "Video only"
      },
      "clips_step": {
        "list_description": "Select 3-8 seconds of your video clip to use in your canvas",
        "title": "Add Clip",
        "description": "Add your own content or use a clip from our library",
        "status_added": "Clip Added"
      },
      "style_step": {
        "title": "Choose Style",
        "description": "Styles add visual effects to your video"
      }
    },
    "clips_selector": {
      "processing": "Processing",
      "uploading": "Uploading",
      "delete_upload": "Delete this upload",
      "create_video_modal_description": "Add this clip to your music or canvas video",
      "create_video_button": "Make a video with this clip",
      "clip_details_collection": "Part of the <1>{{name}}</1> Collection",
      "keywords": "Keywords",
      "clip_details_page_title": "Clip: {{uuid}} {{appTitle}}",
      "featured_clips": "Featured Clips",
      "aria_list_of_clips": "List of clips",
      "collections": "Collections",
      "moods": "Moods",
      "search_clips": "Search Clips",
      "search_result": "<strong>{{count}}</strong> result",
      "search_result_other": "<strong>{{count}}</strong> results",
      "search_result_with_term": "<strong>{{ count }}</strong> result for \"{{searchQuery}}\"",
      "search_result_with_term_other": "<strong>{{ count }}</strong> results for \"{{searchQuery}}\"",
      "popular_keywords": "Popular Keywords",
      "show_more_clips": "Show more clips",
      "library_menu_item": "Library",
      "uploads_menu_item": "Uploaded Clips",
      "collection_exclusive_to": "Exclusive to {{scope}}",
      "collection_details_page_title": "{{collection}} Clips {{appTitle}}",
      "collection_clips_count": "{{count}} Clip",
      "collection_clips_count_other": "{{count}} Clips",
      "collections_page_title": "Collections {{appTitle}}",
      "too_many_files_error": "You're attempting to upload too many files simultaneously. The maximum is {{maxFiles}}.",
      "upload_clips_touch": "Tap here to upload files",
      "upload_clips_desktop": "Drop files here to upload",
      "supported_extensions": "We support {{supportedExtensions}}",
      "max_clips_alert": "You've reached the limit of clips ({{maxClips}}) that can be used with this style",
      "mood_details_page_title": "{{mood}} Clips {{appTitle}}",
      "moods_page_title": "Moods | Clips {{appTitle}}",
      "output_progress_header_count": "Clip selected",
      "output_progress_header_count_other": "Clips selected",
      "smart_select_clips_loading": "Finding clips…",
      "smart_select_clips": "Smart Select Clips",
      "remove_all": "Remove all",
      "similar_clips_title": "More Like This",
      "remove_clip": "Remove this clip",
      "added_clip": "Added",
      "adding_clip": "Adding",
      "tooltip_max_clips_limit_reached": "Your selected video style allows you to use up to {{maxClips}} clips",
      "use_clip": "Use this clip",
      "uploads_page_title": "Uploads {{appTitle}}",
      "user_uploads": "Your Uploads",
      "show_more_uploads": "Show more uploads",
      "filter_uploads_all": "All Uploads",
      "filter_uploads_all_short": "All"
    },
    "ui": {
      "create_video_modal": {
        "video_name_header": "Give your new {{videoTypeLabel}} Video a name",
        "video_name_label": "Video name",
        "video_name_placeholder": "e.g. Your Track Name",
        "creation_flow_header": "What do you want to create?",
        "creation_flow": {
          "rotor": {
            "title": "Music Video",
            "description": "Use our footage or upload clips to create your music video"
          },
          "artwork": {
            "title": "Art Track Video",
            "description": "Just add your artwork for a video that vibes to the beat"
          },
          "canvas": {
            "title": "Spotify Canvas Video",
            "description": "A 3-8 second loop video for your track on Spotify"
          },
          "lyrics": {
            "title": "Lyric Video",
            "description": "Promote your music with dynamic, professional lyric videos"
          },
          "motion": {
            "title": "Apple Music Album Motion",
            "description": "Put your Album Art in motion with our tool designed for Apple Music"
          }
        }
      },
      "delete_clip_modal": {
        "error_title": "Something went wrong, please try again later.",
        "error_back_button": "Go back",
        "videos_title": "Deleting this clip will remove it from videos you have created",
        "videos_description": "If your videos are still in progress we recommend that you complete and download your videos before deleting the clip.",
        "videos_back_button": "Never mind, go back",
        "videos_confirm_button": "Delete clip anyway",
        "affected_videos_count": "This clip is used in {{count}} video",
        "affected_videos_count_other": "This clip is used in {{count}} videos",
        "title": "Are you sure you want to delete this clip?",
        "back_button": "No, go back",
        "confirm_button": "Yes, delete clip"
      },
      "error_alert": {
        "description": "Please refresh the page and try again. If the problem persists contact support.",
        "reload_button": "Reload Page"
      },
      "file_uploader": {
        "permission_title": "Do you have permission to use this file?",
        "permission_message": "We don't want you getting in trouble for using copyrighted material",
        "permission_confirm_label": "Yes I do",
        "permission_cancel_label": "No I don't",
        "drag_accept_title": "Those files look good. Go ahead and drop them.",
        "drag_reject_title": "Some of the files will not be uploaded"
      },
      "image_uploader_dragging": {
        "message": "Drop this file to upload your image"
      },
      "maintenance": {
        "fallback": "We are currently performing maintenance. We will be back shortly.",
        "order_acceptance": "Due to unforeseen technical issues, we are currently unable to accept orders.",
        "closing_message": "Thank you for your patience and understanding."
      },
      "style_group_list": {
        "compact": {
          "description": "Styles add visual effects to your video",
          "user_active_group": "Active",
          "user_history_group": "History"
        }
      }
    }
  }
}
The localisationResources object provided to the RotorVideosProvider component is used to
localize or override
the text strings used in the Rotor Videos components.
By providing this object, you can override the default localizations, as it uses deep merge to combine both objects.
Language detection
Language detection source
- cookie (set cookie i18next=LANGUAGE)
- sessionStorage (set key i18nextLng=LANGUAGE)
- localStorage (set key i18nextLng=LANGUAGE)
- navigator (set browser language)
- querystring (append ?lng=LANGUAGE to URL)
- htmlTag (add html language tag <html lang="LANGUAGE" ...)
- path (http://my.site.com/LANGUAGE/...)
- subdomain (http://LANGUAGE.site.com/...)
By default, the current language is automatically detected from the user's browser, but you can also set the language manually by following the instructions in i18next-browser-languageDetector plugin.
Adding new language
Example of a new language localization
{
  "es": {
    "general": {
      "retry": "Intentar de nuevo",
      "close": "Cerrar"
    }
  }
}
In order to add a new language, you need to provide a new top-level key, which is the language code, in
the localisationResources object.